
If you’ve ever had an orchid leaf turn yellow at the base and fall off the stem, then your orchid might have had stem rot, or collar rot. Stem rot can occur due to improper watering practices in orchids. In this way, it is very similar to crown rot and root rot in orchids.
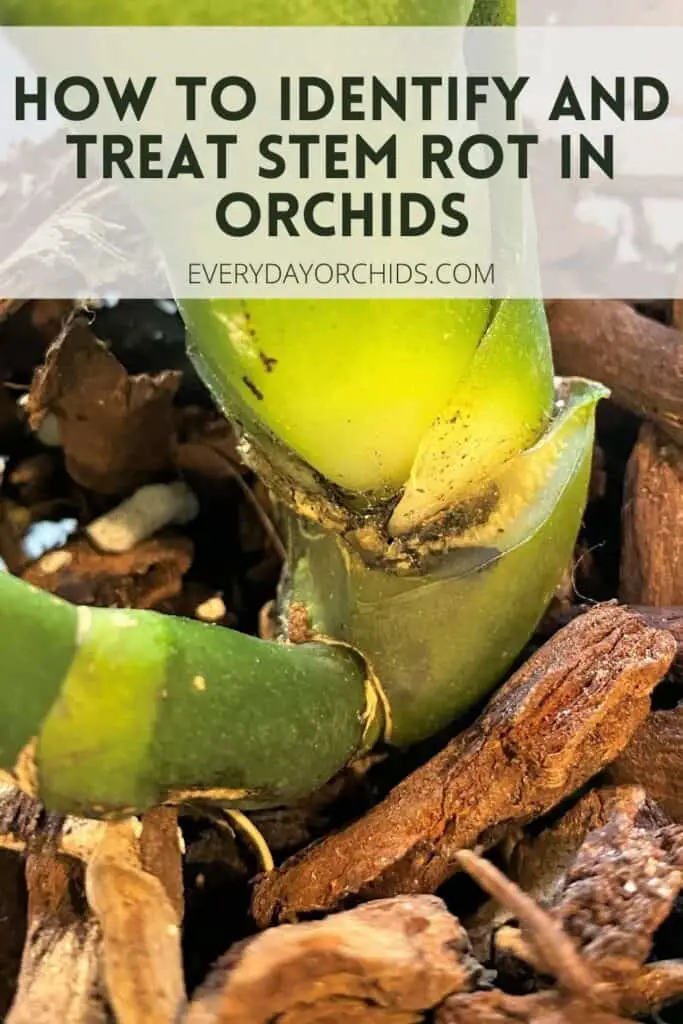
Stem rot is sometimes called collar rot. It is the result of standing water left in the crevices between the orchid leaves and the main stem. Bacterial or fungal pathogens grow in the stagnant water. This can lead to yellowing, rotting leaves which fall off the stem. If left untreated, stem rot can quickly spread and kill the orchid plant.
If you are new to orchid growing, or have an orchid where one or more of the leaves are turning yellow and falling off, you’ve come to the right place. I’ll help you figure out whether your orchid has stem rot or not. Plus, you’ll learn what causes stem rot to occur, along with the most common signs of stem rot.
I’ll also give you some methods to treat this infection and hopefully save your orchid. Moving forward, you’ll learn some prevention tips to keep stem rot from happening again in the future. Keep reading to learn more.
Please note that these links are affiliate links and as an Amazon Associate, I earn from qualifying purchases. Purchases made through affiliate links in this post may generate commissions at no additional cost to you. Use this link for a discounted Amazon Prime trial. Thank you for your support!
Table of Contents
What Causes Stem Rot In Orchids?
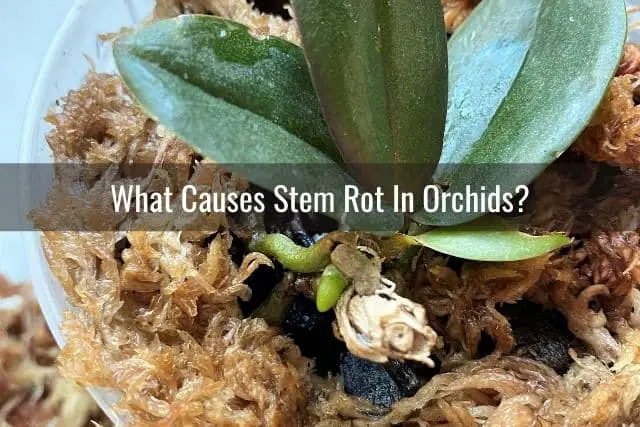
As I mentioned earlier, stem rot is a result of standing water left in the crevices between the orchid leaves and main stem. Stem rot is sometimes referred to as collar rot. This is because the rot occurs around the “collar” of the orchid’s stem.
Stem rot, or collar rot, is a bacterial or fungal infection most often associated with monopodial orchids such as Phalaenopsis orchids. Stem rot is also seen in Vanda orchids. Unfortunately, monopodial orchids, such as Phalaenopsis and Vandas, are susceptible to many types of orchid diseases due to the plants’ structure and shape.
Stem rot is caused by bacteria or fungal spores germinating in the water left between the orchid’s crevices and folds. As a result of high humidity conditions or lack of air circulation, the water might not be able to evaporate in a timely fashion. The stagnant water then becomes a breeding ground for pathogens. Overtime, the multitude of bacteria or fungus leads to rotting of the plant tissue.
Stem rot can also occur if the Phalaenopsis orchid is potted too low in the orchid pot.
In this case, the lower leaves may be partially buried in the potting media. Either that or they may be resting on top of the potting media. When this happens, water can easily settle into the crevices between these leaves and the main stem, leading to stem rot.
How To Identify Stem Rot Or Collar Rot In Your Orchid
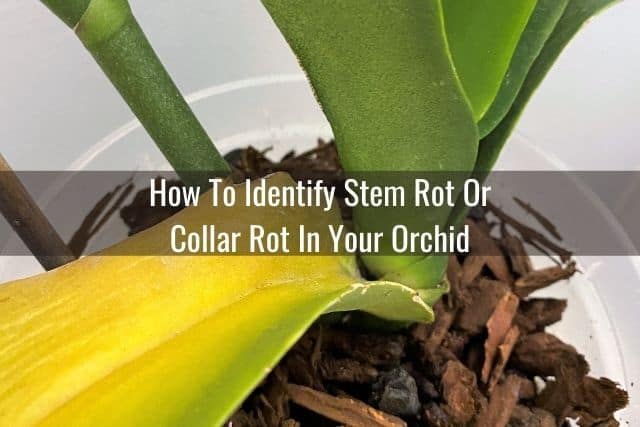
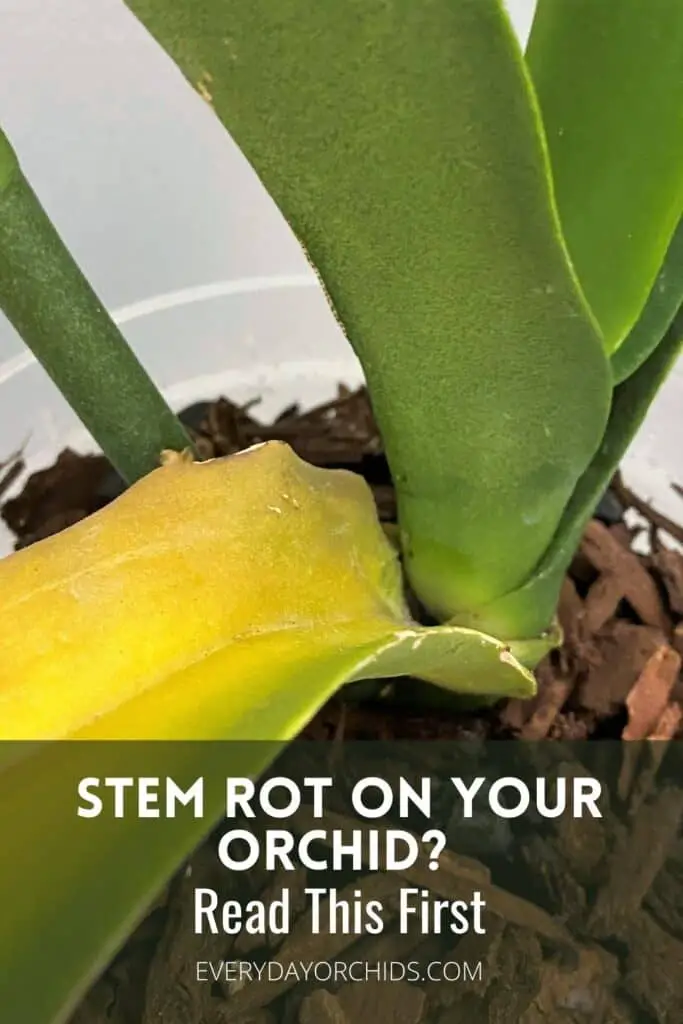
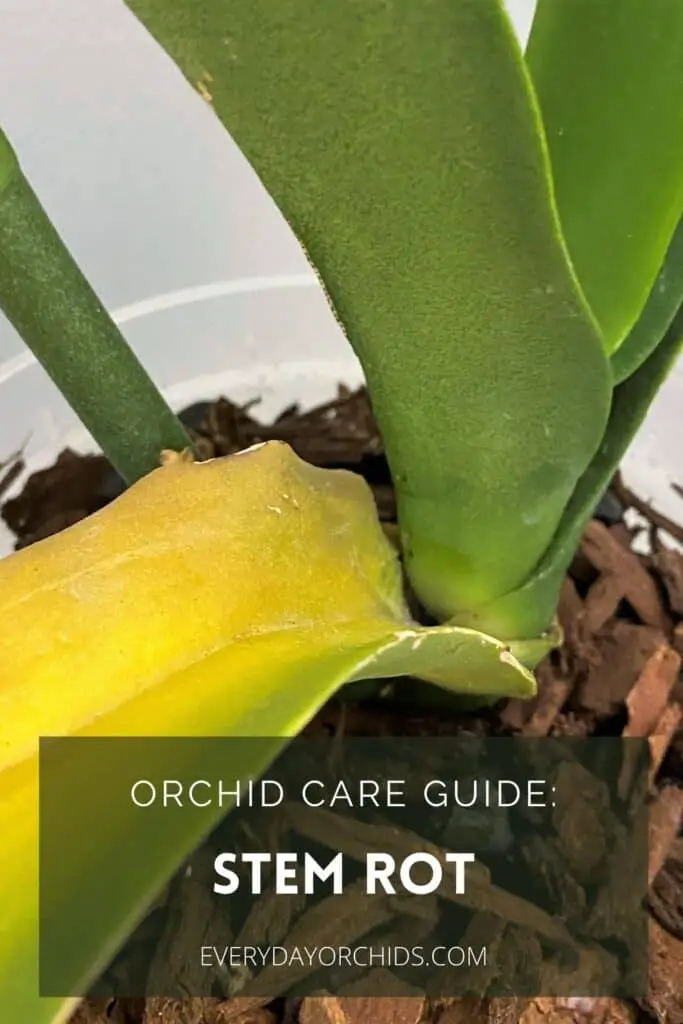
In the earliest stages, the affected leaf (or leaves) will start to turn yellow. Leaves affected by stem rot will begin to turn yellow closest to the orchid’s main stem. Note: this is different than older leaves which will turn yellow beginning at the outermost edges. Yellowing that begins at the leaf edges is normal and will happen as the leaf reaches the end of its life. If the yellow discoloration starts at the base of the leaf, that is not normal and never a good sign. In this case, this happens because of stem rot.

As time goes on, the yellowing will continue to spread down the leaf out to the edges. The area of the leaf where the yellow discoloration started will become soft, mushy and light brown. In some cases, squeezing on this part of the leaf will generate fluid, or exudate, from the leaf. This is due to the plant tissue breaking down.
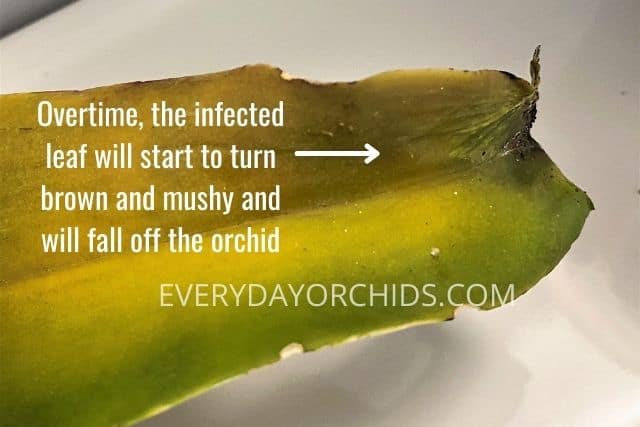
In later stages, if the leaf is still attached, the rotted area on the leaf will start to turn a darker shade of brown. The main stem will have some discoloration too. However, it will be hard to see this on the main stem while the leaf is still attached. As the rot progresses, the yellowed, infected leaf will fall off on its own.
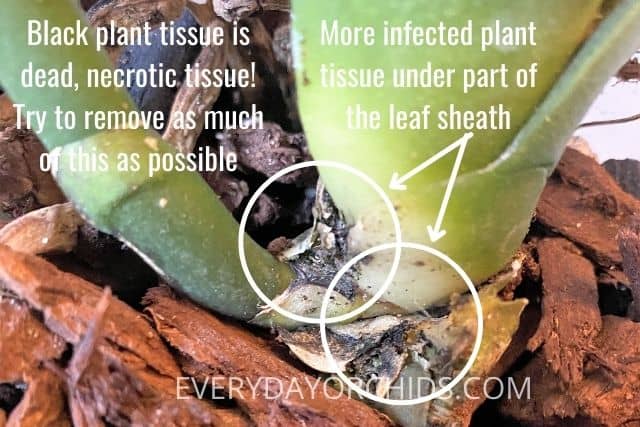
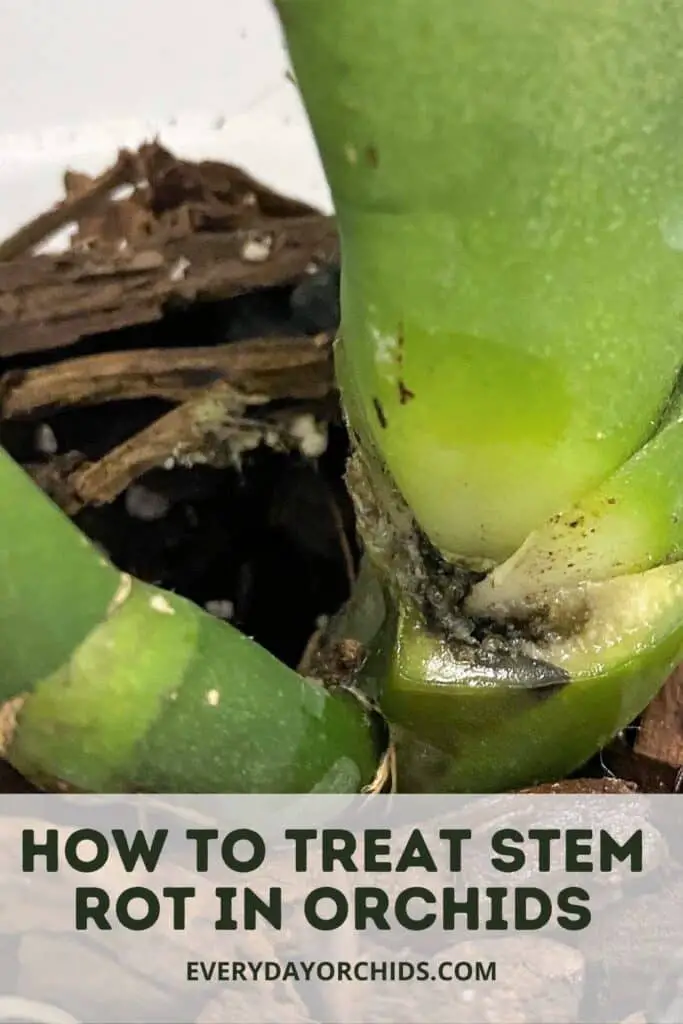
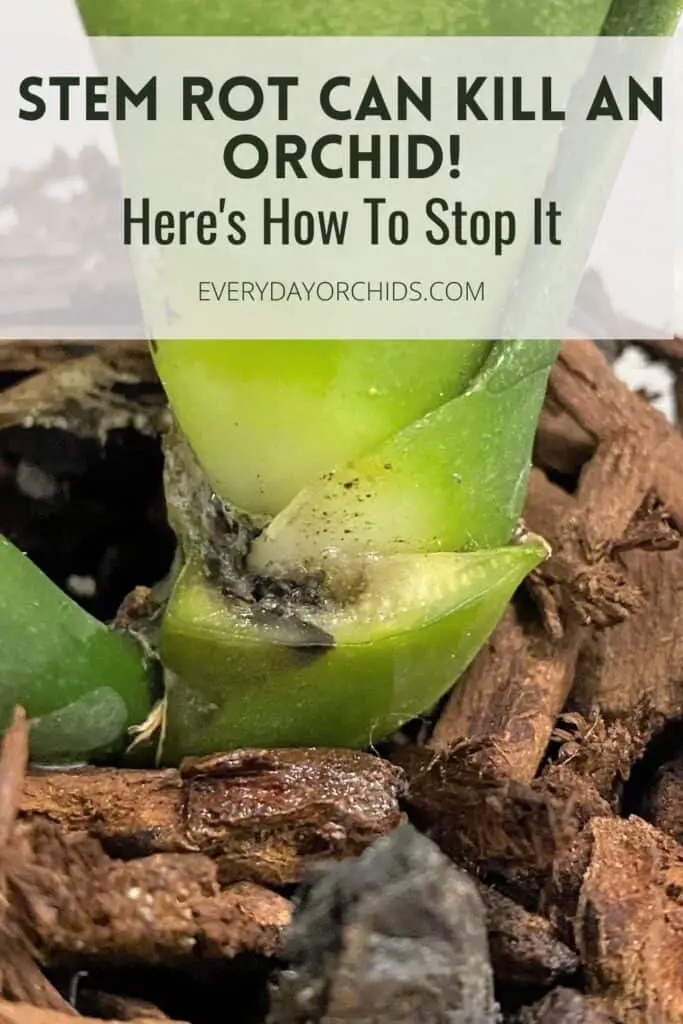
Once the infected leaf is no longer attached, you’ll be able to see the infected area on the orchid’s main stem. In many cases, this will have turned light yellow and and the center may have some brown or black discoloration, depending on the severity of the infection.
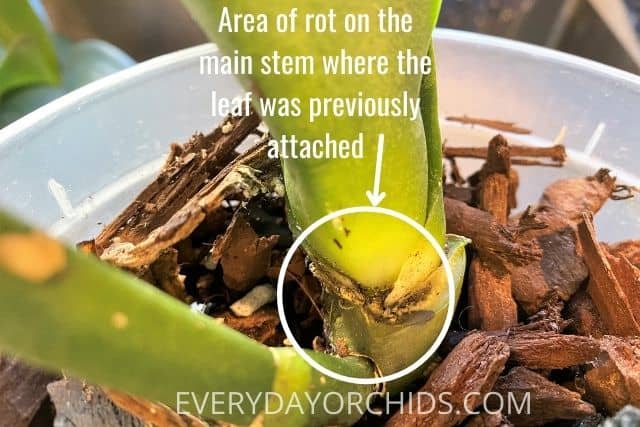
As the rot spreads, this yellow discoloration will darken. It will eventually turn brown, then progress to black. If nothing is done, the orchid will die as the main stem collapses from widespread rot.
How Fast Does Stem Rot Spread?
Stem rot can progress rapidly. An orchid leaf can turn yellow and fall off within a few days to a week due to the rot. Once the leaf is no longer attached to the main stem, you’ll be able to see areas of rot on the orchid. Pale yellow patches will surround the brown or black areas of rot. This can be found on one or both sides of the main stem.
If leaves on both sides of the Phalaneopsis or Vanda orchid have fallen off, chances are, the infection is severe. It has likely spread throughout the main orchid stem.
Left untreated, stem rot will continue its upward progression and more leaves will yellow and fall off. In some cases, the main stem will completely break off the base and fall off, leaving a blackened, necrotic stump.
Stem rot is fairly serious and can quickly kill an orchid within weeks, or even days, if left untreated. Once you identify the problem, you’ll need to treat it aggressively to prevent it from spreading to the rest of your orchid.
Stem Rot Vs. Crown Rot
Before I go into the treatment options, I wanted to mention crown rot. If you have stem rot, there is a chance your orchid may have crown rot as well.
Yes, that’s right, it is possible for an orchid to have crown rot and stem rot at the same time. This often happens because the orchid was watered from overhead. Overhead watering leads to splashing. Water can easily collect in both the crown (leading to crown rot) and the crevices between the leaves and stem (leading to stem rot) if the orchid was not properly watered.
It is also possible for an orchid to just have crown rot OR stem rot, and not both. It all depends on where the water settles in the orchid.
Just be aware of these key differences: Crown rot mainly affects the top two orchid leaves and the top part of the orchid’s main stem. In contrast, stem rot can occur anywhere along the orchid’s main stem. This is because water can collect in the crevices of any of the leaves connected to the main stem.
If you are wondering if your orchid has crown rot, read this guide on crown rot and learn how to identify and treat it.
How Do You Treat Stem Rot In Orchids?
There are a few treatment options for an orchid experiencing stem rot, or collar rot. The key to saving your orchid lies in quick action and aggressive treatment.
Isolate Your Orchid
First, isolate your orchid from your other orchids and houseplants. Moving your infected orchid plant away from your other plants is a critical step and should not be skipped. Isolating your orchid will help ensure that your other plants stay healthy.
Cut Away All Infected Plant Matter
Next, carefully remove the infected, yellowing leaf from the orchid’s stem. Generally, the rot originates at the connection between the leaf and the stem, so the leaf should come off easily with a slight tug.
If the infected leaf doesn’t come off easily with a light tug, get a sterilized razor blade. I would recommend something like this razor blade tool with removable razors that you can change out and sterilize. Or, if you prefer something you can use once and dispose of afterwards, you can try these single-use sterilized razor blades.
Both products have handles, which are needed for safety purposes. This will minimize the risk of you cutting yourself with the blade. Just be sure you dispose of the blades safely, such as in a sharps container, after use.
Using your sterilized razor blade, carefully cut away the leaf from the stem. Try to remove as much of the leaf as possible. There is no point to saving the leaf. It is already infected and leaving it on the orchid will do more harm than good.
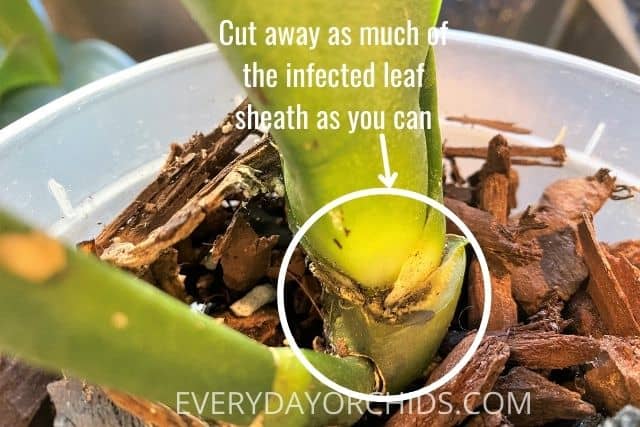
In addition, use the razor blade to cut away as much of the leaf sheath as you can. This is the part of the leaf that surrounds the orchid’s main stem. It connects the leaf to the stem and is likely infected as well.
Use the blade to cut away as much infected plant tissue as you can. Dispose of the leaf and sterilize the razor blade. Wash your hands.
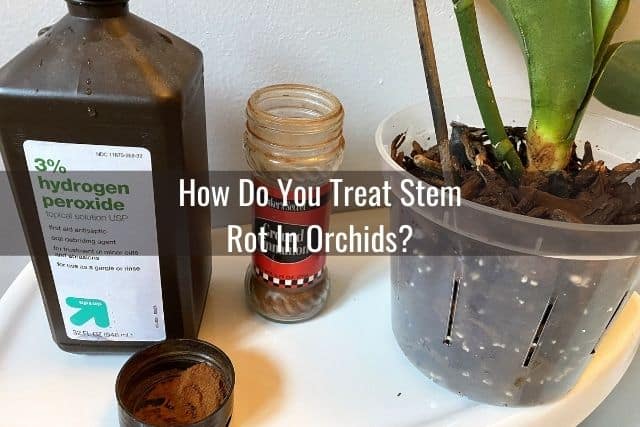
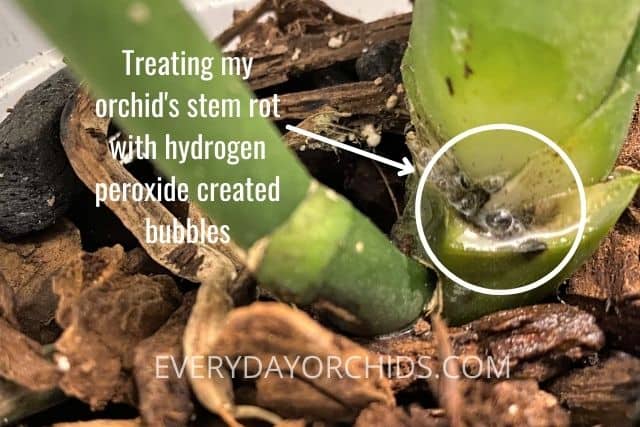
Treat With Hydrogen Peroxide Or A Fungicide
If you identify the infection early on, you can treat the area with some 3% hydrogen peroxide and ground cinnamon. If the stem rot has spread and the damage is extensive, I would recommend using a fungicide on your orchid. Let’s talk about these options in more detail.
3% Hydrogen Peroxide
If you spotted the signs of stem rot on your orchid early on, give yourself a pat on the back. There is a good chance you can save your orchid and stop the spread of rot.
After you’ve removed all the infected plant tissue, grab a bottle of 3% hydrogen peroxide. You can find this product in most drugstores and grocery stores, in the first-aid section. It is relatively inexpensive and my go-to treatment option for crown rot.
Hydrogen peroxide works well in treating minor stem rot and crown rot cases in orchids.
Apply a small amount 3% hydrogen peroxide to the rotted areas of the plant. This may be a little tricky since the rotted area may be under some leaves. If this is the case, I would suggest using a dropper, pipette, or a spoon to apply the hydrogen peroxide.
When applying 3% hydrogen peroxide to the area of rot, use just enough to cover the rotted area. Don’t go wild and saturate the orchid. If you’ve caught the stem rot early, you may only need just a few drops of hydrogen peroxide. Try your best to avoid getting it on the healthy tissue or the orchid roots below.
The hydrogen peroxide will bubble and fizz upon contact with the infected plant tissue. Continue to apply hydrogen peroxide to the infected orchid tissue every other day. Do this until you no longer see bubbling or fizzing.
Be sure you do your hydrogen peroxide treatment early in the day. This will give your orchid and the potting media time to dry out before night fall.
Note: it will be inevitable that a small amount of hydrogen peroxide may drip down into the potting media. If you are concerned about it getting on the roots, hold a tissue under the infected area to catch any excess hydrogen peroxide run-off.
Ground Cinnamon Powder
Once the hydrogen peroxide no longer bubbles or fizzes upon contact with the infected tissue, you can use ground cinnamon powder to cover the infected area and dry it out.
Ground cinnamon powder is readily available in grocery stores, usually found in the baking aisle. You just need a small amount, so you can just buy the smallest container available.
Why ground cinnamon powder? Well, ground cinnamon powder is a great anti-fungal agent, used to treat fungal infections in orchids. It is also a desiccant, or drying agent. I actually use this routinely in my orchid care to treat infections or seal up cut areas after pruning. You can read more about using ground cinnamon powder in orchid care here.
Once you have your ground cinnamon powder, dab a layer of powder over all the areas of infected orchid tissue. You can either do this by using the pad of your (clean!) finger or use a cotton swab. Allow the ground cinnamon powder to sit for a few days. You do not need to apply more than once.

Hopefully by taking action right away, you were able to isolate the stem rot to just one area and stop it from spreading. However, if the stem rot, or collar rot, is extensive, you may need to use a fungicide instead.
Fungicide Products
There are a few different fungicides out on the market. One fungicide you can safely use on your orchids is Physan20. Be sure you dilute it following the product instructions first. If possible, try to avoid getting Physan20 on your orchid roots. There is a risk that it might damage the delicate velamen covering the roots.
Banrot fungicide is another great option for dealing with stem rot in orchids. It comes in a powder form so you will need to mix it with water before use. For orchids, mix 1 tablespoon of Banrot fungicide powder with 1 gallon of water. This is an effective systemic fungicide, but be careful when applying it. If you get any of the solution on your skin, rinse the area immediately with water.
Southern Ag Copper Fungicide is another option. This fungicide is use to treat both bacterial and fungal diseases in plants. Cleary’s 3336F fungicide can also be used to treat fungal infections in orchids.
When using any of the fungicides listed above, take basic safety measures beforehand. Apply the product in a well-ventilated area. If possible, do the fungicide treatment outdoors. These products are caustic, so wear gloves. Follow the product directions for dilution and don’t pour the fungicide on your orchids straight from the bottle.
Just remember, a little will go a long way for your orchids! All of these fungicide products can also be used on other ornamental plants and garden plants as well. Just check the product label for specific dilution instructions for different plants.
Fungicide Treatment Guide
In severe stem rot infections, I would also recommend unpotting your orchid and changing out the potting media. Take this time to check over your orchid’s roots.
Using a pair of sterilized gardening shears, remove any rotted and dead roots. Use a sterilized razor blade to remove all the infected orchid leaves and the infected section of the orchid’s main stem.
Dispose of all infected plant tissue. Spray down your cutting tools in a 10% bleach solution. If you prefer not to use bleach, here are some other methods you can use to sterilize gardening tools.
Next, drench your orchid plant in the fungicide solution, focusing particularly on the infected areas. Depending on what fungicide you use, you will most likely have to dilute it to make it safer for orchids. Follow the product label instructions.
Do this early in the day so your orchid has time to dry off before nightfall. Drenching the orchid will help kill off any fungal spores that you cannot see and deal with any areas of infection that you may not be aware of yet.
Once you are done, repot your orchid using new orchid potting media and a clean, sterilized orchid pot. Don’t reuse the old potting media or an old orchid pot that hasn’t been sterilized. There is an off-chance that there may be pathogens lingering in the old media or pot. You don’t want to reinfect your orchid after all this work you’ve done to nurse it back to health.
When repotting your Phalaenopsis orchid, be sure to position it so the lowest leaves sit higher above the potting media. This will help improve air flow under the bottom orchid leaves and go a long way in preventing future cases of stem rot. For more details, check out my step-by-step guide to repotting orchids.
How Can You Prevent Stem Rot In Your Orchids?
As you may have guessed, dealing with stem rot can be either a minor annoyance, if you manage to catch it early, or a major task, if it is well advanced. Obviously, it is better for your orchid not to get stem rot in the first place. So what are some simple ways you can prevent stem rot in orchids? Here a few tips and tricks:
Isolate Infected Plants
Throughout this process of treating the stem rot, keep your affected orchid isolated from your other plants.
Air Circulation Is Key
Provide good air circulation and air movement around the orchid. You can achieve this simply by opening a window in the room the orchids are kept in.
If opening a window isn’t feasible, use a circulating fan to improve air circulation. Just be sure to set it to low and point it away from your orchids.
Water Properly
Water your orchids early in the day, preferably in the morning. This will allow excess water to evaporate before nightfall. Proper airflow around your orchids will help facilitate water evaporation.
When watering your orchids, focus on watering the roots and avoid watering from overhead. Avoid splashing water into the orchid crown or into the areas between the leaves and stem.
If you accidentally get water into the orchid crown or crevices of the leaves, do your best to remove it. Use the corner of a paper towel to wick this water away.
Manage Humidity And Temperature Levels
Keep the humidity levels within the orchid’s preferred range. Make sure it is not overly damp or humid for your orchid.
In addition, keep temperatures moderate and within the orchid’s preferred range. Use a hygrometer to monitor humidity and temperature levels in your orchid’s growing area.
This is important because high humidity, combined with high temperatures, can accelerate the growth of pathogens. On the flip side, low temperatures can also increase the risk for stem rot. This is because water won’t be able to evaporate as quickly or as easily when it is cold.
Start With A Healthy Orchid
Last but not least, if you are buying a new orchid, check out Everyday Orchid’s beginner’s guide on how to buy a healthy orchid. Use the steps I outline in my guide on orchid buying so you can choose the best and healthiest orchid for yourself or for a friend.
For example, one of the things you’ll want to look for when buying an orchid are signs of stem rot or other diseases. You can easily check for stem rot by giving the orchid leaf a gentle tug. If the leaf comes off, or if you spot yellowing at the base of the leaf near the main stem, put the orchid back and don’t buy it.
Final Thoughts
Of all the orchids, Phalaenopsis and Vanda orchids are most susceptible to crown rot and stem rot, or collar rot. This is simply because of how their leaves are shaped and how water can easily settle in the crevices as a result.
In nature, there is a lot of natural air movement and these monopodial orchids grow on the sides of trees, so crown rot and stem rot are almost unheard of in the wild. However, potted Phalaenopsis and Vanda orchids can easily fall victim to crown rot or stem rot if you aren’t careful with your watering techniques.
If you do find stem rot on your orchid, don’t panic. Use the steps outlined above to treat the stem rot. If the infection is in the early stages, use 3% hydrogen peroxide and ground cinnamon powder to treat it. For more advanced cases of stem rot, use a fungicide to thoroughly treat your orchid and repot it. In addition, follow my tips to prevent stem rot from coming back in the future.
Hope this helps! Thank you for reading, and as always, happy orchid growing.
If you enjoyed this article, please pin it and share!
Recent Posts
Fusarium wilt in orchids is, unfortunately, a problem that you may encounter at one point or another. It is caused by the Fusarium pathogen and this kind of infection can be hard to identify at...
When it comes to choosing an orchid potting mix and knowing what kind of orchid soil is best, the decision can feel daunting. After all, there is a huge variety of options out there, from orchid bark...
