
As an orchid grower, you’ve heard that orchids need to be in a special orchid pot, but what are your options? There are, in fact, many options. There are a wide range of pots and containers specially designed for orchids. Want to know more about orchid pots and why orchids need special pots? You’ve come to the right place.
Orchids need a special orchid pot with holes or slits. Orchid specific pots are essential to ensure your orchid roots remain healthy. When you use an orchid-specific pot, you are guaranteeing that your orchid will receive enough air circulation around the roots and the potting media can dry out between waterings.

In this article, I will explain why orchids need a special pot and why you can’t just use any pot for your orchids. I’ll go over how to choose the right orchid pot and go over the different types of pots available for your orchid. You’ll also learn few other tips and tricks for taking care of these beautiful plants. Keep reading to learn more!
Please note that these links are affiliate links and as an Amazon Associate, I earn from qualifying purchases. Purchases made through affiliate links in this post may generate commissions at no additional cost to you. Use this link for a discounted Amazon Prime trial. Thank you for your support!
Table of Contents
Do Orchids Need Pots With Holes?
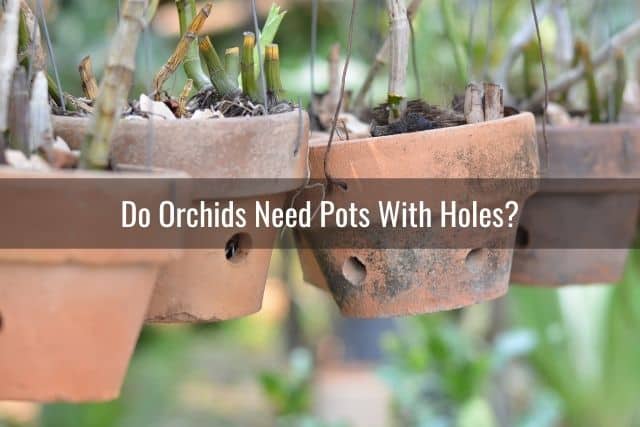
Have you ever seen an epiphytic orchid in the wild? If so, you will notice they have aerial roots and do not grow in the soil.
Many orchids are epiphytes, meaning they live on trees and other plants. They get their water and nutrients from their surroundings, such as the rain, air, and debris around their roots. In the wild, orchids are not confined to pots (obviously!). Their roots are not in danger of constant contact with damp potting media.
When you grow orchids, you want to try to mimic their natural environment and growing conditions as much as possible. The holes and slits in orchid pots allow for air movement around an orchid’s roots. This mimics how air flows around orchids in the wild.
Orchids need pots with holes to ensure their roots have adequate air circulation. Orchid pots with holes or slits on the side allow for water drainage. They also provide some ventilation to the orchid roots. Both of these factors are crucial for maintaining healthy orchids.
What Would Happen if You Put Your Orchid in a Regular Glazed Pot With No Holes or Slits?
Let’s say your friend recently handed a fancy, beautiful pot to you because they knew you liked and grew flowers. Alternatively, you may have seen this wonderful glazed pot that you just could not resist buying. You really want to put your orchid in it. The problem is, its not an orchid pot. It doesn’t have any holes or slits on the sides. Would it really hurt your orchid if you place it inside a regular glazed pot with no holes or slits?
The short answer is, yes. Potting an orchid in a pot without any holes or slits will cause the orchid to eventually die. By repotting your orchid into that pot, you decrease the amount of air circulation available. You also increase the amount of water the roots are exposed to for a longer period of time. This will eventually lead to root rot. Just like how we need air to breathe, orchids need air to live. Without it, they will eventually die.
You can however, save this pot and use it to double pot your orchid. I do this with a lot of my orchids. Double potting orchids keeps the orchids from tipping over, particularly when they are in bloom and top-heavy. I will go into more detail about that potting method later, so keep reading.
Why Would You Want a Terracotta Pot for Your Orchid?

You may have seen terracotta, or clay pots, at the garden center. You might have even heard other people on orchid forums mention using terracotta or clay pots for orchids. What is so special about these pots? Why would you want to use them for your orchids?
Terracotta pots are inexpensive and relatively easy to find at your local hardware or garden store. When you buy them, get the specialized terracotta pots for orchids with slits or holes on the sides. These are specifically designed for orchids.
Glazed Vs. Unglazed
You can find these pots in many colors, shapes, and sizes. These pots come glazed or unglazed.
If you can find a glazed orchid pot with holes or slits on the sides, you will find that these can make a beautiful addition to your home while still providing air circulation to the roots. An example of this would be this blue 6-inch orchid pot with holes or this white ceramic 6.5-inch orchid pot with a saucer.
The unglazed version is significantly less expensive. An additional (major) benefit of unglazed terracotta pots is that they are able to absorb water from the potting media. The clay material allows the pot to wick the excess water away from your orchids and into the pot. This helps minimize your orchid’s risk of dying due to overwatering.
Moreover, the porous clay material facilitates airflow within the pot. This provides the air circulation necessary for orchid roots. Glazed terracotta pots are not porous and will not be able to wick away moisture in the same way. Keep this in mind when choosing your pot.
Watering Your Orchid in an Unglazed Terracotta Pot
Don’t assume that if you have a terracotta pot, it will take care of any overwatering problems you have. You will still need to regulate the amount of water you give your orchids. You can learn about how to water an orchid here.
Problems Related To Overwatering Your Orchid
If you tend to overwater your plants, unglazed terracotta pots may not be able to keep up with the moisture accumulation in the potting media.
While the clay material may be able to wick away the water initially, the constant presence of moisture will not allow the clay to fully dry. Over time, this constant state of moisture on the clay pot itself will lead to mold growth on the outside of the pot.
Sadly, I have seen this happen with my own orchids when I was still new to orchid growing. If the mold is left untreated, it will spread from the pot to the potting media and the orchid roots. If you do end up with this problem, here is a helpful guide on how to deal with mold on your orchid potting media or roots.
Problems Related To Underwatering Your Orchid
On the flip side, underwatering an orchid can also lead to problems, especially if it is in a terracotta or clay pot. Remember, the porous nature of the unglazed clay or terracotta pot allows it to absorb water from any nearby source.
In other words, if you do not water your orchid often enough, the potting media will stay dry. As a result, the clay pot will begin to absorb water from the roots themselves.
When this happens, some orchid roots will get stuck to the sides of the pot. This can prove challenging when it comes time to repot the orchid. It will be difficult to get the orchid out without breaking the pot and/or the roots. To avoid this scenario, you will want to avoid underwatering your orchid. Check the orchid potting media regularly and water the plant when the media feels dry.
If you are repotting and your orchid roots have already adhered themselves to the pot, try to moisten the pot and roots ahead of time. I usually soak the entire pot in water, roots and all. Then, slowly and gently pry each root away from the sides of the pot. This will minimize the damage to the roots.
Clay Pot Caveats and Things to Know
While most clear plastic pots cannot support top-heavy plants by themselves, terracotta and clay pots can simply because they are heavier. These pots are able to balance out a top-heavy orchid. This is an important benefit of using clay pots. An orchid falling over due to a lack of support runs the risk of an orchid spike or stem breaking, or worse.
However, because these pots are made of clay, they are also prone to chipping or breaking when dropped or knocked over. The very porous nature that allows for airflow and water absorption also leads to cracks. If the pot is left outdoors during freezing temperatures, it can become damaged over time due to the temperature and moisture changes.
Should You Put Your Orchid in a Clear Pot?
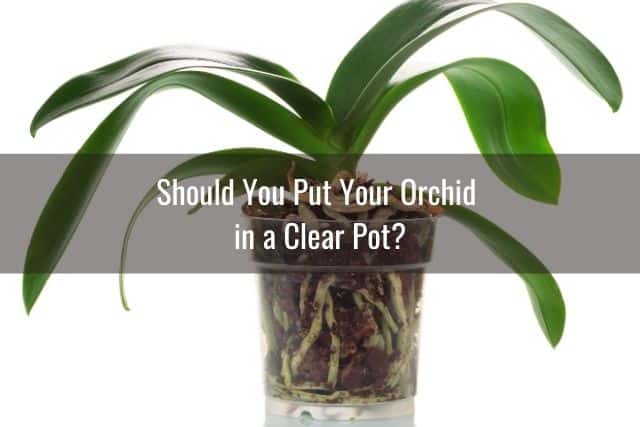
A terracotta or a clay pot for your orchids sounds great, but would a clear pot be more beneficial to your orchid? You may have heard that most people actually choose to use clear plastic pots for their orchids. Moreover, orchids are often sold in clear pots at farmers markets. So, should you use these instead?
The answer is, it depends. Orchids do not necessarily need clear pots, but they do make an orchid caretaker’s life easier. Orchid growers often opt for translucent pots because it allows them to monitor their orchids’ roots easily.
When I first started caring for orchids, I preferred terracotta or clay pots. Nowadays, the majority of my orchids are potted in clear plastic orchid pots.
By using a clear plastic pot, you can monitor your orchid’s roots easily. You can see at a glance how healthy (or not) are the roots. Clear pots allow an orchid grower to also see if the roots are becoming overly crowded. You can easily check how wet or dry the potting media is or know at a glance if the orchid needs to be repotted.
Moreover, the see-through nature of a plastic orchid pot allows the sunlight to easily shine through and reach the roots. This is highly beneficial to the orchid roots and allows them to perform photosynthesis. Remember most orchids are epiphytes and in the wild, their roots are normally exposed to the air and light.
Another benefit to clear plastic orchid pots is that they are light-weight. This allows you to more easily gauge when your orchid needs to be watered. While I recommend using the top two inches of potting media to decide if your orchid needs water or not, you can also get an idea by picking up the orchid pot. A lightweight orchid pot likely needs to be watered and a heavy orchid pot likely does not.
As a last bonus point, plastic orchid pots are also more durable. They less susceptible to breakage if they are dropped or exposed to temperature extremes.
Can I Use a Basket For My Orchid Instead?
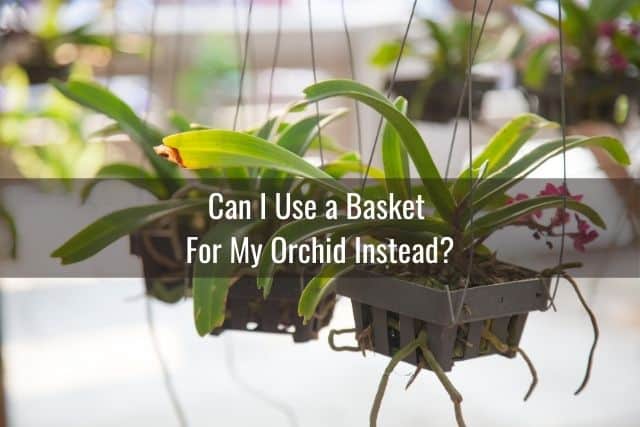
If you prefer not to use clay pots or clear plastic pots for one reason or another, there is another alternative. Some people like using plastic baskets such as this one or wooden-slatted containers like these. These are wonderfully decorative and unique. The numerous spaces between the slats also offer your orchids great ventilation.
Vanda orchids have long roots and are best potted in orchid baskets. Be sure to add wire mesh to your basket’s bottom when setting it up. This will ensure that your potting media does not fall through the slats on the bottom of the basket.
In general, orchid baskets have a number of open spaces on the sides of the container. This will also allow you to loop some sturdy rope or wire through the holes. Many Vanda orchid growers hang their orchid baskets from a pergola or ceiling hook to allow the long orchid roots to trail down under the pot.
Things to Keep in Mind When Using Baskets as an Orchid Pot
If you choose a wooden orchid basket, you may need to repot your orchids more frequently than you would with a terracotta or a plastic pot. This is because the wood can start to break down over time due to the organic nature of the material.
In addition, when repotting or moving your orchid, you will need to be mindful of any orchid roots that have made their way between the wooden slats. Those roots will need to be maneuvered through the slats or baskets holes carefully when repotting. Do this minimize the chances of breaking the roots. Using this particular style of container may be more work during the repotting period. However, the beauty and unique style can make it well worth the effort.
Plastic Baskets as an Orchid Pot
Plastic orchid baskets are also used to pot orchids. The plastic will not break down like a wood basket would, but you will still need to be careful of the orchid roots when repotting. The roots will inevitably make their way out between the basket slats.
Plastic baskets are easier to find and less expensive than their wooden counterparts. In theory, you can go to the dollar store and find a number of plastic baskets that might work for housing your orchid. There are also plastic baskets being sold that are specifically made to hold orchids. An added benefit to these plastic containers is that they are lightweight.
When Should I Repot My Orchid?
You may already possess an orchid that has been in its same pot for years. Or perhaps you have a new orchid and simply want it start it in the right pot. When is the right time to repot your orchid?
You should put your orchid in a bigger pot when:
- Your orchid has many roots growing out of its container or it is starting to lean to one side. If there are a significant number of roots growing out of the container, causing the orchid to tilt to one side, your plant has outgrown its container. You will need to repot your orchid into a larger container.
- The potting media has decomposed and broken down, no longer providing adequate space and air circulation for your orchid’s roots. Over time, the orchid potting media will inevitably start to break down and decompose. When this happens, the potting media will become more dense and compacted over time. This will restrict the airflow to the roots while also staying damp longer, leading to problems such as root rot.
- You notice packed and tightly tangled roots on your orchid. This signifies that your orchid has outgrown the current pot. It is time to transfer it to a bigger pot.
- Some of the roots are rotting. If you see a number of mushy brown roots on your orchid, you have root rot. You will need to take your orchid out of its pot and remove the dead, rotted roots. Treat the plant for root rot. Then replant your orchid in a new, sterilized pot with new orchid potting media.
How Do I Know What Pot Size is Best for My Orchid?
So once you’ve decided to repot your orchid, the next question is, what size orchid pot should you use?
First, figure out what size pot your orchid is currently using. You can do this by taking a ruler or a measuring tape and measuring the across the top of the pot. This will give you the diameter (use inches) and will tell you the size of your pot. For example, if the diameter, or measurement across the top of your pot, is 4 inches across, then you have a 4-inch pot.
In general, when repotting your orchid, you will want to move up 1-inch in pot size. So if you have been using a 4-inch pot, you will need a 5-inch pot. Moving up just an inch in size will give your orchid roots room to grow, while keeping your orchid secure and stable within the pot.
The exception to this recommendation is if you’ve trimmed off a large number of orchid roots due to rot or dehydration. If this is the case, use the same size orchid pot or go one size smaller. Repotting your orchid in too large of a pot can, over time, lead to an increased chance of overly damp potting media and root rot.
What To Do When Orchid Roots Grow Out of the Pot
When your orchid roots grow out of the pot, you may need to repot your orchid, but not always. Sometimes, roots simply grow out of a healthy orchid’s pot. These are called aerial roots. In this case, the orchid may not need any repotting. However, other times, orchid roots may grow out of its pot because it needs a bigger pot.
If this is your orchid and you don’t know where to start, check out this guide on how to repot an orchid with aerial roots here.
You will know your orchid needs a bigger pot when you notice one too many roots coming up out of the pot. You may also notice your orchid has a tightly tangled root system.
How To Repot an Orchid
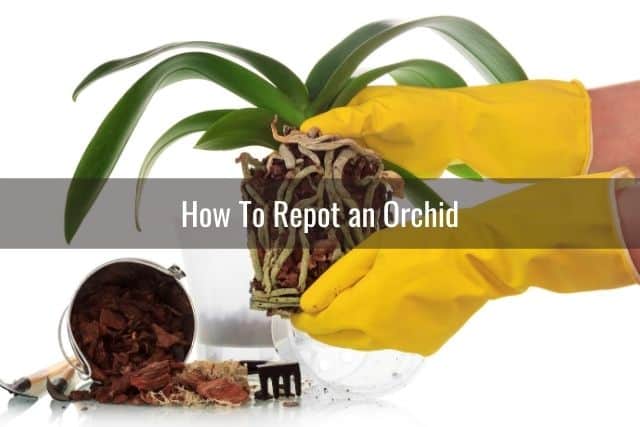
So based on all that you have learned so far, you’ve concluded that it is time to repot your orchid. You have your new orchid pot and your orchid ready to go. The question is, how do you actually repot an orchid? In another article, i provide a step-by-step guide on how to repot your orchid, but here is a quick overview.
The best time to repot an orchid is just after it has finished blooming. In fact, this is one of the things I recommend doing after your orchid flowers fall off. This way, you can take advantage of an orchid’s recovery period to allow the orchid to grow new roots and leaves.
Repotting an Orchid
- Prepare some needed materials. This includes:
- A sterilized orchid pot, ideally 1-inch bigger than the last pot
- A sharp pruning shears or scissors sterilized with 10% bleach solution
- A dull knife such as a butter knife
- A pair of gloves
- New orchid potting media
- Anti-fungal powder specifically for orchids, such as ground cinnamon
- Plastic bucket with room-temperature water
- Sterilize your orchid pot. If you are using the oven-sterilization method for your clay pot, this process may take a few hours from start to finish. If you are using a 10% bleach solution to sterilize your pots, you will want to sterilize your orchid pots the day before you plan to repot. Give your new pots ample time to air dry before you place a new orchid in it. Whatever method you use, you will want to sterilize and prepare your pots the day before the actual repotting occurs.
- Soak the new potting media. On the day of repotting, you can start by soaking your potting media. Here’s some info on how to choose the right orchid potting media. Fill the bucket with room-temperature water. Place the new orchid potting media in the bucket of water to soak. Let it soak while you continue to prune the orchid and trim the dead roots. Soaking the media is an important step. It will help create a humid environment for your orchid in its new pot.
- Gently pry the orchid from its pot. You may find that the orchid roots are stuck, sticky, or pot-bound. To deal with this, if it is a plastic pot, you can gently press around the sides to loosen the root mass. If that does not work or you don’t have a plastic pot, you can use a dull flat instrument to loosen the roots. Use the back of a dull knife and slowly run it along the interior of the pot. This will help detach any stuck roots from the sides of the pot.
- Soak your orchid roots in water. This eliminates any excess and unwanted old potting media from around your orchid’s roots. It also loosens up the orchid’s potentially stiff or dry roots and softens its tissues. Be careful not to get water in the orchid stem or crown.
- Untangle the orchid’s root mass. Your orchid roots need ventilation and room to grow, so you might need to gently untangle the roots. Besides providing ventilation, this also helps you further remove any old potting media and dead roots.
- Cut or trim the unhealthy roots. If you have brown, mushy, soft roots, your orchid likely has root rot. The roots might also be dried and shriveled up due to dehydration. Repotting is the best time to deal with this situation. Using a sterilized pair of scissors or pruning shears, cut off these unhealthy roots. Apply an anti-fungal powder such as ground cinnamon to the cut ends.
- Place your orchid into the new, sterilized pot. Take some potting media from the bucket of water and place it at the bottom of the pot. Carefully place your orchid inside the pot, centering it in the pot. Keep the base of the orchid stem level with the rim of the pot. Start placing more potting media around the orchid roots. You do not want to make the potting media too compact. Just place enough potting media around and over the roots so that the orchid is well-supported and will not shift around in the pot.
Orchid-Growing Medium
While it is possible to make your own custom orchid potting mix, the easiest solution would be to buy a bag of orchid potting mix online or from your local garden center. With so many different types of potting media out there, I created a guide to choosing the right orchid potting mix.
Before using your orchid potting media, be sure to check for any mold or foul-smell when you open the bag. If you experience this, return the bag to where you bought it or throw it away. You do not want to start off repotting your orchid with contaminated potting mix.
Orchid-specific potting media is essential to ensure proper orchid growth. A typical orchid potting mix contains light-weight, porous, and fast-draining materials. These materials might be pieces of bark mixed with peat, coconut husk fibers, sphagnum moss, perlite, or horticultural charcoal.
What Are the Best Pots/Containers for Orchids?
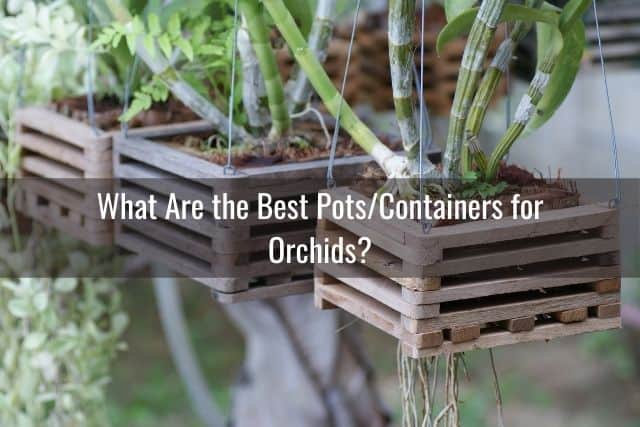
By choosing the right pot for your orchid, you are taking the first steps to ensuring your orchid lives a long and healthy life. There are a lot of different types of orchid pots and containers out on the market. This can make it difficult to choose the best one for your plant. Here are some key points to keep in mind when choosing the best pot for your orchid.
Key Points to Consider When Buying an Orchid Pot
The orchid pot or container should have ample ventilation via its holes or slits on its sides. While you may choose a clay, plastic or wooden container, it is essential that it has holes or slits for ventilation.
Consider your local climate when picking the type of material for your orchid pot. If you live in a warm, dry location, a clay or terracotta pot might be the best option.
However, if you tend to overwater your plants, this clay pot may end up moldy and bacteria-filled as time goes on. If this is the case, then you will benefit better from choosing a clear plastic pot. This way you can see your orchid roots’ health and whether or not it needs more water.
Alternatively, a wooden orchid basket may suit you best. It has wide, open spaces between slats for the water to pass through and air to enter. It is much more difficult to overwater an orchid that is potted in a basket.
Why Should You Double-Pot Your Orchid?
If you really want to place your orchid in a decorative pot without holes, the best option would be to use the double-potting method.
To do this, plant your orchid first in a light-weight clear plastic pot with holes or slits on the sides. Then, place this pot inside a larger ceramic or decorative pot. Keep in mind that the orchid will not have as much airflow to the roots with this double potting method. This is because the second pot will minimize some of the air flow around the first pot.
Most people generally use the double-potting method for three reasons:
- Double potting will boost your orchid’s aesthetic appearance.
- It will guarantee a sturdier base for your top-heavy orchid.
- Double potting will still allow you to easily check if your orchid needs watering due to the see-through first pot.
Once your orchid is safely potted in the clear plastic pot, you can place it in a heavier and more decorative container. This allows you to showcase your orchid’s beauty while also ensuring your orchid receives proper support at its base.
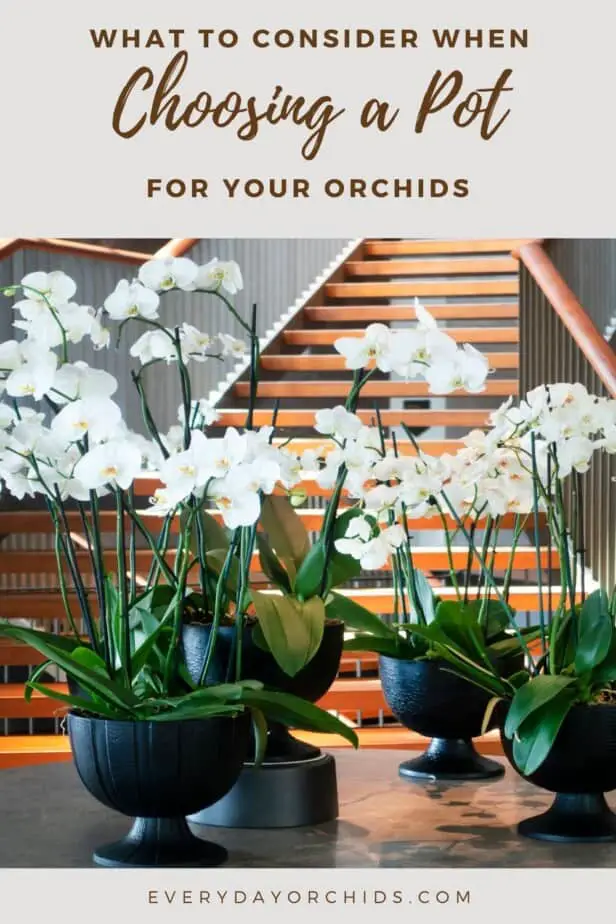
Things To Consider When Choosing the Best Pot for Your Orchid

When selecting the most suitable container for your orchid, it is best to consider a few crucial things. This includes the pot’s holes, size, strength, durability, and height. Remember, varying orchid types grow differently, so it is best to consider that as well.
These are the factors you need to think about when buying an orchid pot:
- How many holes does the container possess? An ideal orchid pot should feature at least 4-6 holes on the sides for sufficient ventilation. Similarly, pots with slits are also ideal since they provide a higher level of ventilation.
- What pot size should you use? A pot that is too small will limit an orchid’s ability to grow. You can figure out your orchid’s required pot size by examining its root mass.
- Can the container hold the orchid when it blooms? Some orchids may be top-heavy, especially if there are a lot of flower spikes and blooms. It is best to research more about your orchid to know where it lies in terms of weight. Some pots may not have the ability to adequately support a heavy orchid. This is especially true if the orchid is in a small, plastic pot.
- Will the pot last? If you plan on keeping plenty of orchids around, you may wish to opt for a heavy-duty pot. Choose a durable pot that can be sterilized and reused over and over.
- Is the container just the right height? Generally, an orchid pot works best if it is shorter rather than taller. Taller orchid pots allow the orchid roots to retain moisture more than shorter containers.
- What kind of material is used for the pot? Typical orchid pot materials include terracotta or clay, plastic, wood, ceramic, and mesh. You will often see orchid growers opt for plastic and clay pots. However, some may also choose wooden pots, ceramic pots, or mesh containers.
Typical Orchid Pot Materials
As mentioned earlier, terracotta or clay orchid containers are useful due to their ability to wick away moisture. However, this feature may backfire if you tend to overwater or underwater your plants.
Meanwhile, plastic pots, especially clear plastic pots, allows orchid growers to properly and easily monitor their orchid’s health. However, plastic containers are not as sturdy as other containers. If your orchid is top-heavy with a lot of spikes and blooms, it may tip over if it is kept in just a light-weight plastic pot.
Another option is a wooden orchid container or basket. This promotes great ventilation. It also provides a clear view of your plant’s root mass. However, it may start to break down within a year or two of constant water exposure. You may also use mesh containers as your orchid’s home.
Lastly, ceramic greatly enhances an orchid’s appearance. Plenty of orchid owners choose this container alongside a clear plastic pot using the double-potting method.
Orchid Pot Recommendations
If you want to buy orchid-specific containers but are not sure where to find them, check out these great options from Amazon. (Please note that these are affiliate links. I do earn a small commission at no cost to you if you use these links.)
- 4-Inch Plastic Pots from Clear Pots – Perfect for most orchids, and it comes in a pack. However, note that the holes on these pots are only on the bottom. I have a couple orchids potted in these and found that they need less frequent watering in these types of pots.
- Slotted Orchid Pots Pack from Repot Me – Comes in two copies of four-pot sizes, and each pot has side slits and bottom holes. I have personally used these for my orchids and have found that they work well.
- Plastic Holed Pots from Meshpot – Clear mesh pots ideal for double-potting.
- Wooden Basket from Sun Bulb – Cute basket to showcase your orchid’s beauty. Perfect for Vanda orchids.
- Wood Slat Basket from Jim’s Orchid Supplies – Simple but sturdy basket. Good for smaller orchids and Vanda orchids.
- 6-inch Ceramic Orchid Pot– Glazed ceramic pot with plenty of holes to allow proper ventilation of your plant.
- Holed Decorative Pot by Atri – Another great ceramic pot with holes for airflow.
Final Thoughts
In the wild, orchids live on trees and other plants. When caring for your orchid, remember that they are epiphytes. As such, try to recreate their natural environment as much as possible.
A clear plastic container with holes and slits serve orchids best. You may also opt for terracotta or clay pots, wooden pots, mesh containers, or ceramic pots with holes. When repotting your orchid, be sure to use a special orchid pot with holes or slits on the side. This will ensure your orchid has adequate airflow and ventilation and the roots remain healthy.
If you enjoyed this article, please pin it and share!

Recent Posts
Fusarium wilt in orchids is, unfortunately, a problem that you may encounter at one point or another. It is caused by the Fusarium pathogen and this kind of infection can be hard to identify at...
When it comes to choosing an orchid potting mix and knowing what kind of orchid soil is best, the decision can feel daunting. After all, there is a huge variety of options out there, from orchid bark...
